Session 13 Prep
Set Expectations
Section titled “Set Expectations”Set the expectations for the session and communicate any above table information FIRST before starting the session…
-
Critical Role Live! We got some confirmation about the characters that will be present so at some stage; closer to the show, I’ll do a short informational session for anyone who wants some context going into it.
-
Please remember to be the audience you would want - even during combat - I don’t mind if there’s increased phone usage during long turns but please take the time to consider multiple options on your turn to help combat move smoothly.
- During RP blocks - I really want to stress asking everyone to be actively paying attention to the scene regardless of your characters involvement.
- I understand that there are times where things pop up and you need to take a call or respond to a message and that’s fine - especially if you’re respectful about it.
- I also understand this a large time commitment and there’s other things going on so if you need to split your focus for a portion of the session - that’s fine within reason - but please let me or the table know before the session starts.
- If you need to leave the table for an emergency - obviously all good you do that but otherwise; i.e. for a bathroom break or whatever, just ask if we can take a short break and we’ll find a simple stopping point in the scene shortly thereafter.
-
Also I am doing a new session prep layout so bare with me if I can’t find my notes as easily T.I.A
-
This session has the potential for a fair chunk of harder combat, you will have to work together and get a bit creative with your strategies.
Recap & Re-Familiarize
Section titled “Recap & Re-Familiarize”Recap the previous session events with brevity, then reintroduce them to the world.
Last we left off… you each made your way out of The Rowdy Roan after speaking with Grez Klimmet about The Dealt Hand. From there you decided to speak with Commander Dae’hya about the investigation, but you were unable to locate him, before an assistant of his informed you he was busy and that we would find you amongst the city later in the day. With time to kill you spent your morning walking to and around The Ratways and trying to get some grounding on The Dealt Hand’s location.
At one point - you took a wrong turn down an alleyway into a dead end and realized you were not alone anymore. Turning around you each saw a visage of a stranger in black leather armour and feathered cloak approaching you. Their attire incited some fear in all of you for an unknown reason before they raised their hand and reveal their true appearance. The figure who would introduce themselves as Somnus approached you - clad in gothic armour and symbols of the moon & The Fate-Cloaked Maiden. After some convincing and a short trip into a magical hut of their creation - you each agreed to accept Somnus’ aid in your investigation.
It was around this time that Cynthia Glint reached out to SHAI and requested you return to The Witch’s Wardrobe for some important. Arriving back at the shop she was transparent with you about a secret she had kept from you all two days prior - it was her who had taken Lady’s bracers on the day of your comrade’s death. She noticed their magic respond curiously to the Monk’s death and decided she could not let them out of her hands until she had a better grasp on who could be behind this sudden tragedy. She had hoped the bracers would reveal the truth behind Lady’s origins or reason for assassination but she could not understand the complex and clearly ancient enchantment on them. The magic seemed so confounding that not even Somnus’ deity - The Maiden could get a grasp on the source.
You were tasked with revealing the secret of the bracers - which seemingly involved introducing them to the remaining Primordial Elements. You made your way to a private alleyway and began to experiment with how you might do that and after a short while; with the help of some lucky weather - you managed to infuse aer, terra, and aqua into your fallen commrades effects.
From there a short detour was taken in the afternoon as some of you explored a book shop called The Book Nook whilst the others returned to The Rowdy Roan - where Jin spoke with Dae’hya about the investigation. Here you learned that The Ratways are out of the jurisdiction of Roan’s forces and any investigations undertaken would have to be of your own accord - the government could not get involved at this stage.
You regrouped and returned to The Ratways where you searched for and successfully located the entrance to The Dealt Hand - a mechanical lift that descended far below the surface contained in a run down building. You plotted for SHAI and Somnus to disguise themselves as the bandits who had attacked you the previous night whilst the others played dead and were carried in.
A tense but successful conversation gained you entry in The Dealt Hand where you were shown to a room to speak with the Exalt of the Monarch Of Madness for your reward. Upon speaking with the woman - you requested an audience with the Monarch who challenged your wit and powers of persuasion, before acquiescing and calling for an escort to take you to see the Monarch Of Madness.
A short while later - a Halfling male wearing a grey hood and cloak arrived as your escort. He led you through the streets of The Ratways towards it’s South east quadrant. Continuing through increasingly run-down neighbourhoods before reaching a quite large warehouse.
Before any of you could react - your escort spun around and dispelled the disguises of both SHAI and Somnus whilst dashing back to safety. Three other bandits approached - one clearly heavily armed - and launched an assault against you all. In a moment of need - SHAI threw Lady’s bracers towards Somnus who called upon The Maiden to repair “this perversion of fate”. The Bracers ignited into a blaze before shooting off into the shape of a phoenix - and moments later, Lady Snowblood returned to the Material Plane - alive and well.
Lady’s sudden return help turn the ambushers into the ambushed as you all dealt with the initial assault effortlessly. The heavily armed leader of the bandits retreated into the warehouse after knocking SHAI unconscious - leaving you alone in the courtyard…
And that’s where we’ll pick up from… - whilst the immediate threat has vanished for now, you still sense danger in the warehouse in front of you. The current day is Kynmark, the 14th of Vaelorn, 920 PD. It is a gloomy day after some rain the previous day
Immediate Event
Section titled “Immediate Event”The immediate action for the Party to deal with.
Go around the table and ask each character for their reaction to Lady’s revival - before asking Lady what she would like to do with her first action out of combat.
Searching the area will aware them 14 + 6D6 Gold & a small leather bound journal.
Enter the Warehouse
Section titled “Enter the Warehouse”Scene
Continuing through the run down warehouse district - you see run down machines, half open steel drums and wooden barrels, and other remnants of a time long forgotten. The roof has clear holes where skylights and other less structurally sound materials had once been & and various sized piles of scrap decorate the interior.
You each notice that the floor is dusty and dirty before your attention is drawn to the centre of the of the warehouse - where two unfamiliar Drow figures are standing with weapons drawn - their red eyes almost glowing in the darker interior of the warehouse.
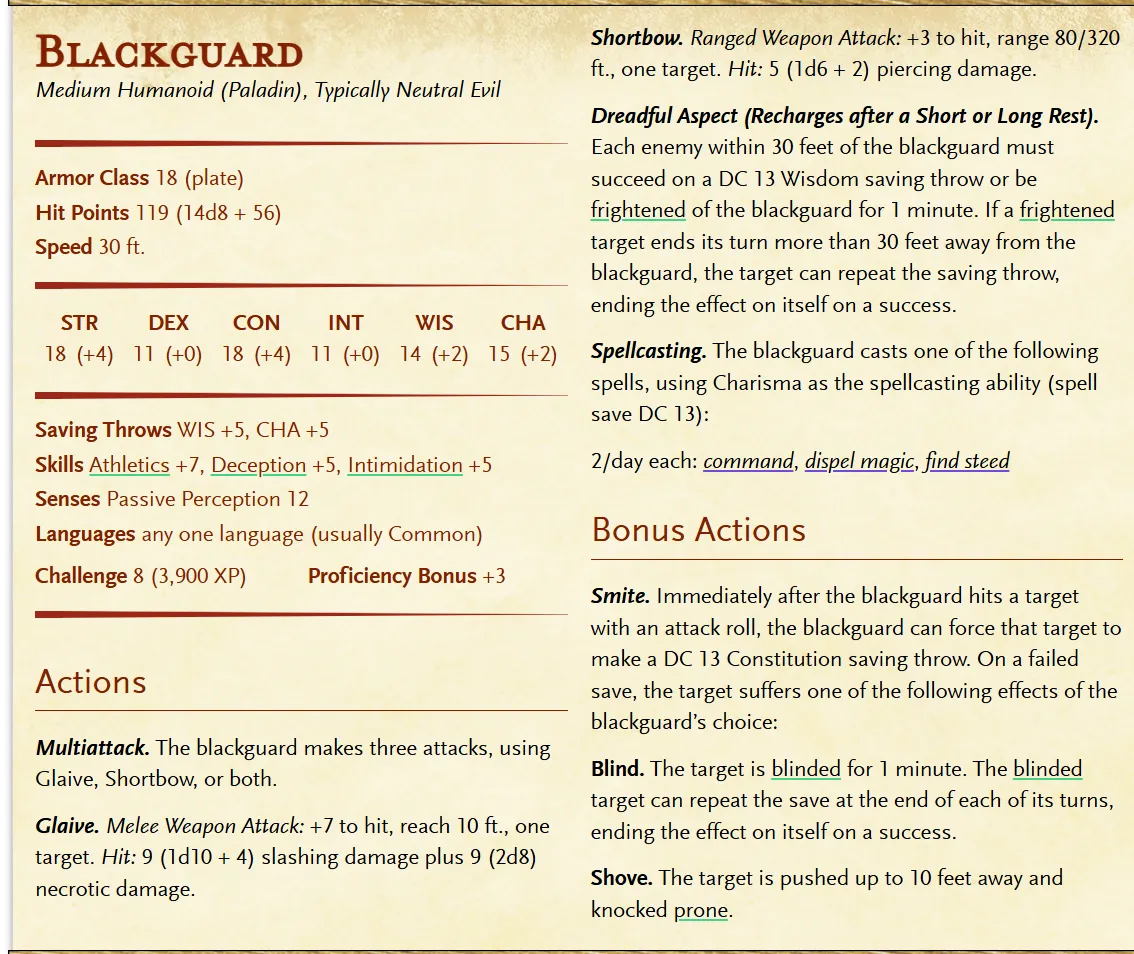
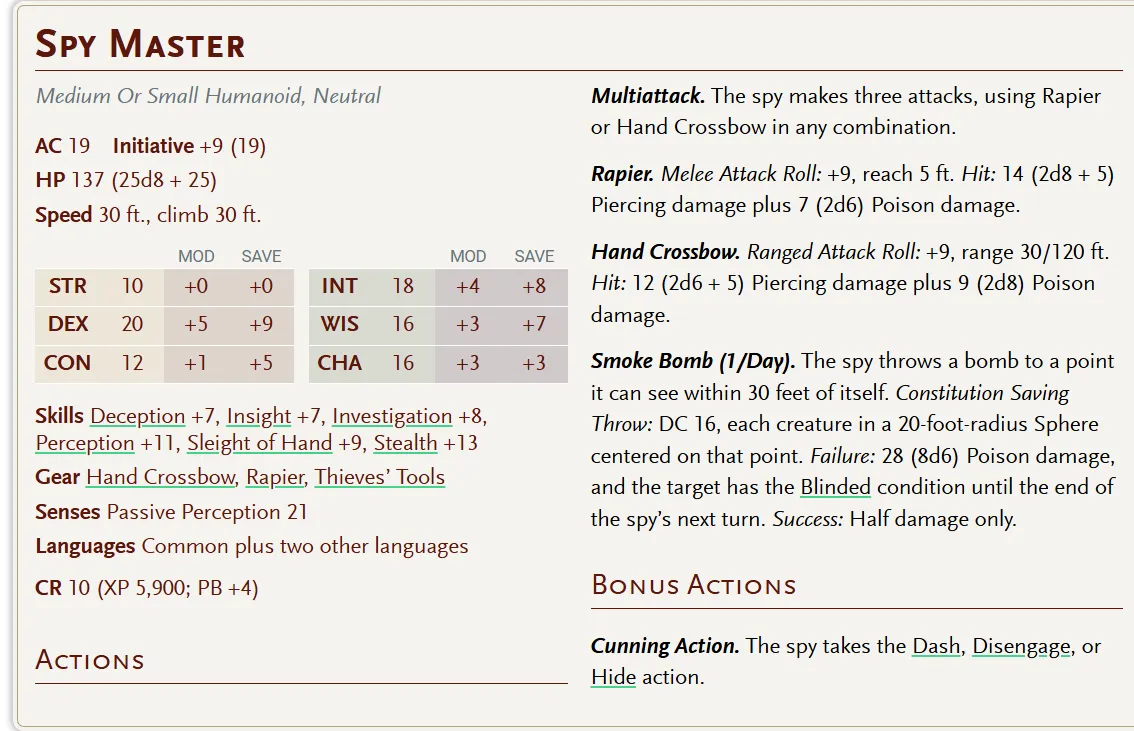
As your eyes adjust to the light, you see a man that is heavily armoured and wielding a large glaive, on the shaft of which you see a decorative jagged crown; similar to what you saw on the Monarch’s door back at The Dealt Hand.
Next to him - is a woman wearing tight fitting leather armour with a a crossbow in one hand & a rapier in the other. Her face is painted with a wide maniacal grin as her shrill voice breaks through the silence in the warehouse “Cain my dear brother, I think we’ve been given new toys to play with!” she says, unable to stand still. “Yes, sister Eden - It seems father has been kind to us this day. Let us make the most of his generosity! he responds with a gruff and almost cruel voice The pair move forward to begin their assault against you.
I need everyone to roll initiative, please
| Cain Blight, (18, +0) | Eden Blight (19, +9) |
|---|---|
 |  |
Scene 2: If combat needs to get harder
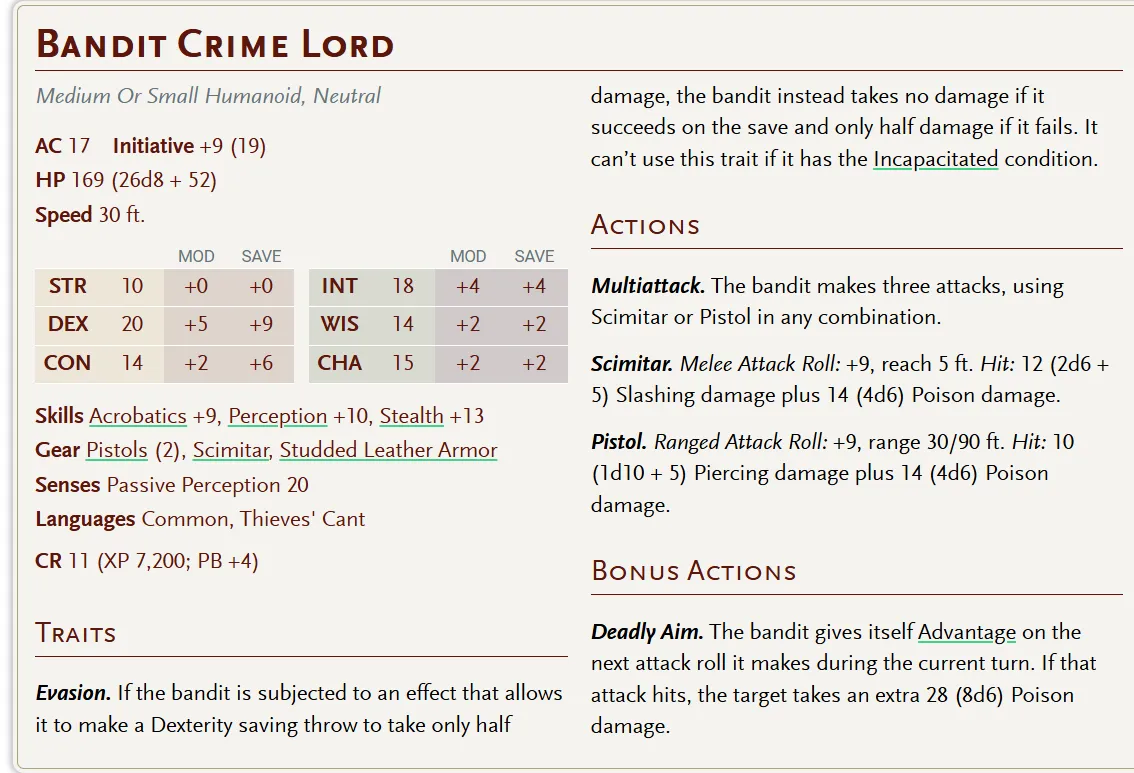
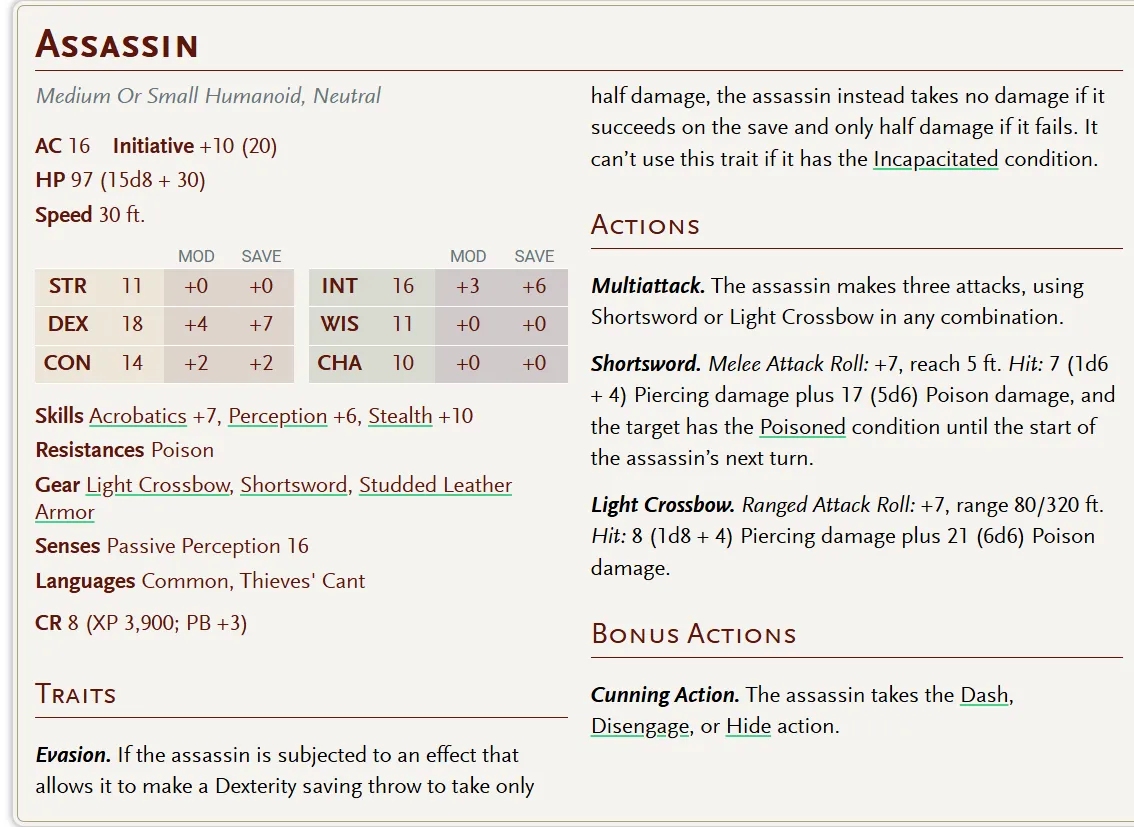
Suddenly and without warning, two of the piles of scrap begin to to shake as pieces fall off and SMASH against the dirty floor. The heavily armed man from earlier jumps out of one of the piles - and a similarly armed woman jumps out from a pile nearest to the door.
| Crime Lord (16, +9) | Assassin (16, +10) |
|---|---|
 |  |
Scene 3: If combat needs to end fast At the start of everyone’s turn - roll a flat D20 (DC15). On a success - The blight siblings will both keel over in pain - Eden Blight more visibly than Cain - as crackling arcane energy surrounds them. Their visage begins to shift as you see flashes of a Half-Elf woman standing where Eden is standing, and a Human man where Cain was.
Regroup and Come Back Later
Section titled “Regroup and Come Back Later”- What do they do?
- Back to the casino? Regaining entry is possible - Elain might even help them out
- Who do they tell?
- The longer they wait to come back the less likely it is that Brannan has not been transformed. Roll a d4 and that is how many days they have before he is transformed.
- Honestly wing this and just see what they do. could be fun could be shit.
- Garhys Steele might bump into them and give them an motivational speech but gauge the vibe.
- “So you beat a couple bandits and ran off? You didn’t follow em?”
- “Guess they don’t make heroes like they used to back in my day…”
- *“What about the missing people?”
- Garhys Steele might bump into them and give them an motivational speech but gauge the vibe.
IF they dawdle too much - have Monarch Of Madness agents begin attacking various parts of the city whilst they’re speaking with Commander Dae’hya - he’ll get a memo mid convo.
I’ve just received word that there are multiple riots breaking out in various parts of the Fortune Markets and heading this way. They’re reportedly wearing grey cloaks and ransacking places in name of this Monarch Of Madness that one of you mentioned earlier.
Please - head to this warehouse and shut this down. My forces will repel this incursion but we have to cut this cancer out at the root.
Plots Points/Paths Forward
Section titled “Plots Points/Paths Forward”Details about various plot threads that can be explored this session - with a subheading for each one.
- Hints that Cain and Eden are two of the 3 missing
- Brannan can be found in the The Laboratory
- Explore the Monarch Of Madness’ warehouse more, even discover the stairwell to the basement and below…
- First mention of “The Anchor” in a research plan/note
The Laboratory
Section titled “The Laboratory”First Floor: Shaped like a D4 - waiting room; beds, some organizational stuff
You immediately get the sense that the room is quite cold and you can see it is almost entirely made out light grey stone. The room is triangular in shape; with equal sides all around, and the walls meet a tip to create a very high ceiling. There are various tables, drawers, and a central raised triangular plinth that seems to have a bit of give underneath it.
- They can explore the drawers and tables but they all seem empty. A DC15 investigation check under one of the tables will reveal a small note that has a drawing of a triangle and a dot in one of the corners. They notice the paper is thin and very translucent. Subsequent investigation checks will allow them to find 3 more with 2 having dots in the corners and 1 in the centre.
- Puzzle: 3 people must stand on each of the corners whilst another stands in the middle.
- Once complete - the plinth will depress flush into the floor and a stair case will unfold in the outline of the plinth and spiral downwards, carved out of the stone itself.
Second Floor: Shaped like a D6 - war room; board tables, chalk boards, arcane projectors
This room is much more comfortable than above. It’s carved from a darker stone and there’s a large board room table in the centre of the room. The room contains a number of chalk boards and smaller desks - alongside some odd looking devices scattered around the room. The room is a similar size to the previous one - but has a square ceiling, walls, and floor instead of triangles.
- There’s chalk board with concentric circles around a central point, and another with odd geometric patterns. There’s a small illustration of 5 oddly shaped pillars arranged around something that has been erased. A DC16 INT check will allow a hint that the chairs aligned with the glasses of water are slightly different than the others.
- The can find a Greater healing potion next to one of the chalk boards, and a Potion of Pugilism
- Puzzle: There are 6 half empty glasses of water at specific seats at the table - The head, the two on it’s left and right, and the 3 at the opposite end.
- Once complete - The perpendicular wall (left) of the entrance
Third Floor: Shaped like a D8 - research floor; books, scrolls, notes
You are caught off guard by the immediate and unexpected temperature drop in this room. It is ice cold in here and even those of you with experience in cold climates will take a good few minutes to acclimate. Initially - the surroundings remind you of the first room - the triangular walls slanting upwards to a single point in the ceiling - however you realise the floor you are walking on is actually a balcony around the perimeter of the room. Looking over the balcony - you see 4 more triangular walls facing opposite those that make up the ceiling.
There is a central column running from ceiling to floor that suspends a double story platform with what look to be bookshelves, chests, and research apparatus. Offset staircases connect the balcony you are walking on to the central platform.
On the lower platform - you see an intricate device made up of a an empty vial underneath a pad of parchment and quill. The vial is connected to some sort of funnel-like device but it unclear beyond that.
- Freezing cold - a nearly completely frozen cup of coffee near a loose page - see Missing Page.
- A journal note containing the following details:
“The Proto-Anchor has proven useful in our experiments, we hope to begin trials of localized alterations by the end of the week.”
- There are various letters that are written in code - on a DC26 Investigation check they can find a letter that is decoded saying:
Accept this payment and finish production of the core.
May The Unseen Thorne Prevail…
- Puzzle: They need to write the 8 “code” words on the paper to open the next door. They can find code words by searching the books around the library where certain words are circled. Each correct word will fill up 1/8th of the vial and persists on the paper. Illegal words will fade away into nothingness
- Code words are circled in red whilst the others are circled in any other colour - DC18 investigation check (advantage if they mention colour or the type of circle)
- Legit Codewords (DC14 Investigation check, +1 each success):
- Maiden
- Deity
- Plane
- Arcane
- Anchor
- Alter
- Astral
- Fate
- Red herring words:
- God
- Pious
- Experiment
- Magic
- Divine
- Terick
- Monarch
- Power
- Change
- Design
- Enforce
- Upon finding all 8 codewords - a gap will open in the wall behind them and reveal a staircase further below - after they have all entered the staircase - it will turn into a slide and they will accelerate into the next room.
CONSIDER ENDING SESSION HERE… OTHERWISE WING A COMBAT/SOME RP
- combat with some blacksmith bandits idk - depends on time
Fourth Floor: Shaped like a D10 - manufacturing floor; machines, hardware, scrapped glyphs
-
Seriously humid and warm - there’s hammers and arcane equipment nearby a still active furnace/generator.
-
**Puzzle: There are is 10 forges which can refine metal **
Fifth Floor: Shaped like a D12 - captives floor; jail cells, ripped straight jackets, research notes
- Temperature is nothing notable but the smell is acrid and off-putting. Has a vile vibe about it.
Sixth Floor: Shaped like a D20 - production floor; full scale experiments, Boss encounter
- The air is electric - there is arcana flowing through every particle in this room.
- In some downtime - Lady can meditate on her revival and speak with one of the four ancestors who aided in the ritual.
- They won’t specify who they are - the spirit will be non-descript and mostly a pale ghost. They will say the following to her:
Our curse is indeed a curse - but not for how you have accepted it. Take this truth to heart and vindicate all those who have sacrificed to get you to this point…
- Set up plot thread of the shadows trying to reveal truths to him.
You notice the shadows clinging to Jin a little closer - and you swear for a second you think that they’re trying to whisper something to him.
- Scene with a hooded, shadowy figure; like endless clouds of smoke falling to the ground:
Two truths have been kept from you - Master Ryujin. Your subconscious has awoken me to realize one of them for you.
The Path Of The Heavenly Demon is not so weak to be bound by wrote-learnt tradition. Cover new ground along said path, make the untaken steps, and overcome the Demons implanted into your mind.
I return to you - your trul fighting prowess…
- Jin can now rebirth his character as a L5 Fighter
- Keep HP the same
- Can reassign stats but keep numbers the same.
- Can choose new feats/background/etc
Missing Page
Section titled “Missing Page”- SHAI can find the missing page of that book in The Laboratory, reads:
- SHAI can make a general intelligence check (DC17) to get a clue from The Dungeon Master, Connor Williams.